

When I launched my first crypto trading bot in 2018, I made nearly every mistake possible. The market was volatile, my algorithms were flawed, and I lost more money than I care to admit. Five years later, my AI-powered trading systems now consistently outperform my manual trading by a significant margin. What changed? Experience, better tools, and a methodical approach to development and testing.
In this guide, I’ll walk you through the entire process of setting up your first AI trading bot, from choosing the right platform to deploying your strategies in live markets. This isn’t theory – it’s practical knowledge based on years of trading through bull runs and bear markets.
Table of Contents
- Understanding AI Trading Fundamentals
- Selecting Your Development Platform
- Setting Up Your Development Environment
- Accessing Market Data
- Building Your First Trading Bot Strategy
- Backtesting Your Strategy
- Paper Trading
- Deploying to Live Markets
- Monitoring and Optimization
- Advanced Techniques
- Risk Management
- FAQ
Understanding AI Trading Fundamentals
Before diving into code, it’s crucial to understand what AI trading actually means and how it differs from traditional algorithmic trading.
What Is an AI Trading Bot?
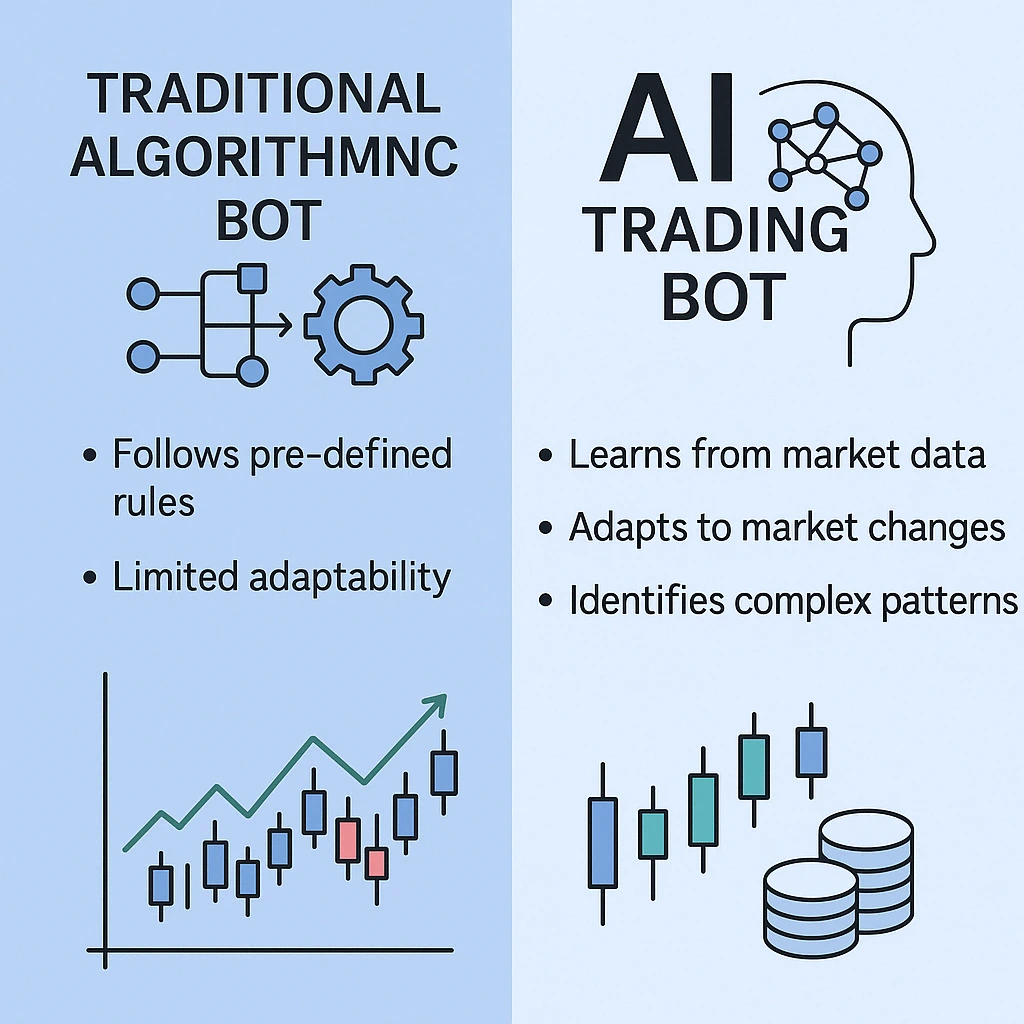
An AI trading bot is a software program that uses artificial intelligence and machine learning techniques to analyze market data, identify patterns, and execute trades automatically. Unlike traditional rule-based algorithms, AI bots can:
- Learn from market data
- Adapt to changing market conditions
- Identify complex patterns humans might miss
- Improve over time with more data
Types of AI Trading Systems
| Type | Approach | Complexity | Data Requirements |
|---|---|---|---|
| Machine Learning | Uses supervised learning to predict price movements | Medium | Historical price data, indicators |
| Deep Learning | Uses neural networks to identify patterns | High | Massive datasets, potentially alternative data |
| Reinforcement Learning | Learns through trial and error to maximize returns | Very High | Market simulation environment |
| Hybrid Systems | Combines rule-based and AI approaches | Medium-High | Varies based on implementation |
As a beginner, I recommend starting with a hybrid approach that combines traditional technical indicators with basic machine learning models. This provides the best balance between complexity and effectiveness.
Selecting Your Development Platform
Your choice of platform will significantly impact your development process and trading capabilities.
Popular AI Trading Platforms
For Beginners:
- Token Estra: User-friendly interface with pre-built strategies
- 3Commas: No-code and code-based bot creation with built-in backtesting
- Zalvix: Familiar to many traders easy-to-use bot
For Intermediate Developers:
- Python + Libraries: Custom development with pandas, scikit-learn, and exchange APIs
- FreqTrade: Open-source bot framework with strategy development in Python
- Gekko: JavaScript-based trading bot with plugin architecture
For Advanced Users:
- QuantConnect: Professional-grade platform with C# and Python support
- MQL5: MetaTrader’s programming language for forex and crypto
- Custom Solutions: Built from scratch with direct exchange API integration
Key Platform Selection Criteria
- Supported Exchanges: Ensure the platform works with your preferred exchanges
- Strategy Flexibility: How much customization is allowed?
- Backtesting Capabilities: Robust historical testing tools
- Costs: Free, subscription, or commission-based?
- Community Support: Active forums and documentation
My Recommendation: For first-time bot developers with some programming experience, I strongly recommend starting with Python and libraries like pandas, scikit-learn, and the CCXT library. This approach gives you maximum flexibility while leveraging existing tools.
Setting Up Your Development Environment
Let’s set up a Python-based development environment for our AI trading bot.
Installation Steps
- Install Python (3.8+ recommended)
- Set up a virtual environment:
python -m venv trading_envsource trading_env/bin/activate # On Windows: trading_env\Scripts\activate - Install required packages:
pip install numpy pandas scikit-learn matplotlib ccxt tensorflow - Install Jupyter Notebook for interactive development:
pip install jupyterjupyter notebook
Project Structure
Create a well-organized project structure:
trading_bot/
├── data/             # Market data storage
├── models/           # Trained AI models
├── strategies/       # Trading strategies
├── backtesting/      # Backtesting framework
├── utils/            # Helper functions
├── config.json       # Configuration file
└── main.py           # Main execution script
Accessing Market Data
High-quality data is the foundation of any successful trading bot.
Data Sources
Exchange APIs
Most major exchanges provide historical and real-time data through their APIs. The CCXT library simplifies accessing this data across multiple exchanges.
import ccxt
import pandas as pd

# Initialize exchange
binance = ccxt.binance({
    'apiKey': 'YOUR_API_KEY',
    'secret': 'YOUR_SECRET_KEY',
})

# Fetch OHLCV data
ohlcv = binance.fetch_ohlcv('BTC/USDT', '1h', limit=1000)

# Convert to DataFrame
df = pd.DataFrame(ohlcv, columns=['timestamp', 'open', 'high', 'low', 'close', 'volume'])
df['timestamp'] = pd.to_datetime(df['timestamp'], unit='ms')
Alternative Data Sources
- CryptoCompare: Comprehensive historical data
- Glassnode: On-chain metrics and analytics
- Santiment: Social sentiment and developer activity
Data Preprocessing
Raw market data needs preprocessing before being fed into AI models:
- Normalization: Scale features to a standard range
- Feature Engineering: Create technical indicators
- Missing Data Handling: Fill or remove missing values
- Time Series Splitting: Create training/testing sets respecting time order
from sklearn.preprocessing import MinMaxScaler
import talib

# Add technical indicators
df['rsi'] = talib.RSI(df['close'], timeperiod=14)
df['ma_50'] = df['close'].rolling(window=50).mean()
df['ma_200'] = df['close'].rolling(window=200).mean()

# Normalize data
scaler = MinMaxScaler()
df[['close', 'volume', 'rsi']] = scaler.fit_transform(df[['close', 'volume', 'rsi']])

# Handle missing values
df.dropna(inplace=True)
Building Your First Trading Bot Strategy
Let’s create a simple ML-based strategy using a Random Forest classifier to predict price direction.
Feature Selection
For our first bot, we’ll use these features:
- RSI (Relative Strength Index)
- Moving Average Convergence Divergence (MACD)
- Bollinger Bands
- Volume indicators
- Price momentum
ML Model Implementation
import numpy as np
from sklearn.ensemble import RandomForestClassifier
from sklearn.model_selection import train_test_split

# Prepare features and target
df['target'] = np.where(df['close'].shift(-1) > df['close'], 1, 0)  # 1 if price goes up, 0 if down
features = ['rsi', 'macd', 'macd_signal', 'bb_upper', 'bb_lower', 'volume_change', 'close']
X = df[features]
y = df['target']

# Split data respecting time order (no random shuffle)
train_size = int(len(X) * 0.8)
X_train, X_test = X[:train_size], X[train_size:]
y_train, y_test = y[:train_size], y[train_size:]

# Train Random Forest model
model = RandomForestClassifier(n_estimators=100, random_state=42)
model.fit(X_train, y_train)

# Evaluate
accuracy = model.score(X_test, y_test)
print(f"Model accuracy: {accuracy:.4f}")
Signal Generation
# Generate trading signals
df['prediction'] = model.predict(X)
df['signal'] = 0
df.loc[df['prediction'] == 1, 'signal'] = 1  # Buy signal
df.loc[df['prediction'] == 0, 'signal'] = -1  # Sell signal
Trade Execution Logic
def execute_trade(exchange, symbol, signal, amount):
    try:
        if signal == 1:  # Buy
            order = exchange.create_market_buy_order(symbol, amount)
        elif signal == -1:  # Sell
            order = exchange.create_market_sell_order(symbol, amount)
        return order
    except Exception as e:
        print(f"Error executing trade: {e}")
        return None
Backtesting Your Strategy
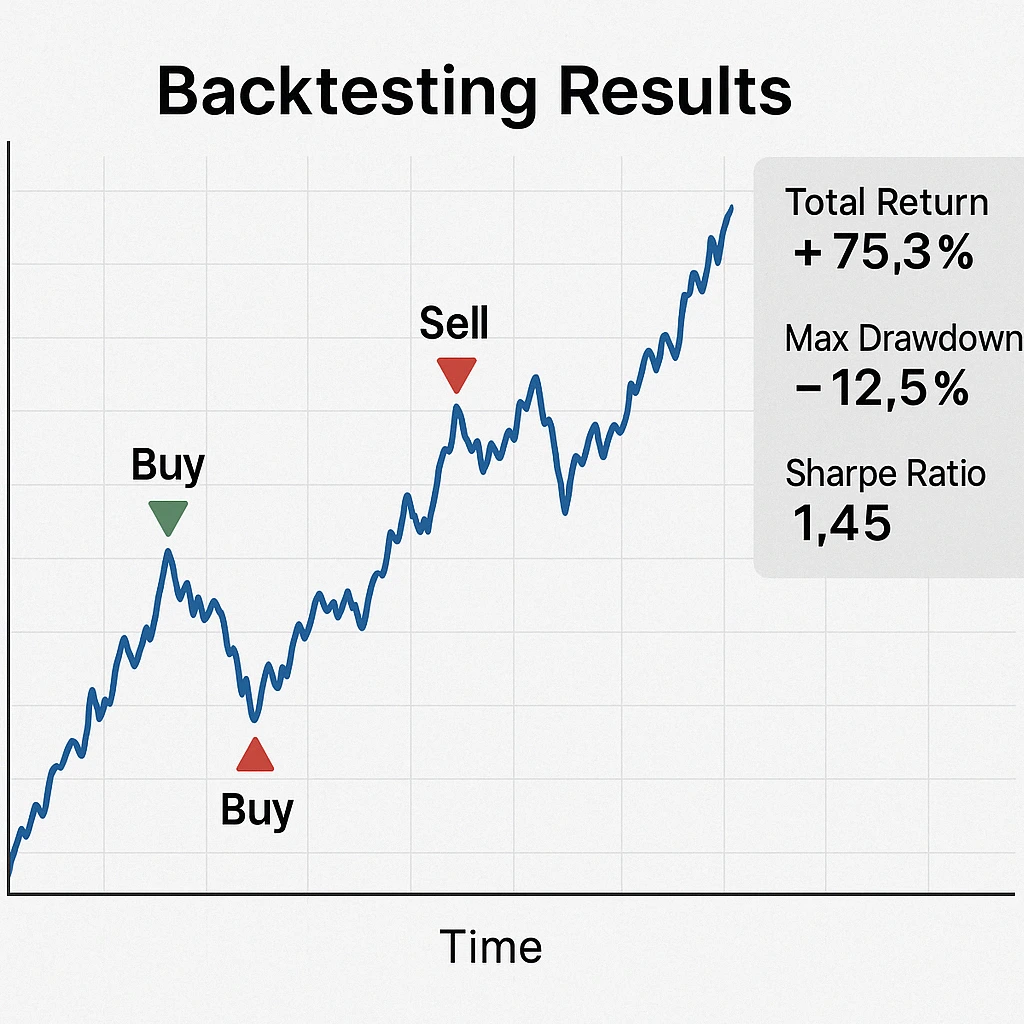
Never deploy a strategy without thorough backtesting.
Basic Backtesting Framework
def backtest(df, initial_capital=10000):
    capital = initial_capital
    in_position = False
    btc_amount = 0
    trades = []

    for i, row in df.iterrows():
        if row['signal'] == 1 and not in_position:  # Buy signal
            btc_amount = capital / row['close']
            capital = 0
            in_position = True
            trades.append(('buy', row['timestamp'], row['close'], btc_amount))

        elif row['signal'] == -1 and in_position:  # Sell signal
            capital = btc_amount * row['close']
            btc_amount = 0
            in_position = False
            trades.append(('sell', row['timestamp'], row['close'], capital))

    # Final evaluation
    if in_position:
        capital = btc_amount * df['close'].iloc[-1]

    return {
        'final_capital': capital,
        'return': (capital - initial_capital) / initial_capital * 100,
        'trades': trades
    }
Performance Metrics
When evaluating your backtest results, consider these critical metrics:
Returns and Risk Metrics
- Total Return: Overall percentage gain/loss
- Annualized Return: Return normalized to yearly rate
- Maximum Drawdown: Largest peak-to-trough decline
- Sharpe Ratio: Risk-adjusted return
- Win Rate: Percentage of profitable trades
Advanced Metrics
- Calmar Ratio: Annual return divided by maximum drawdown
- Sortino Ratio: Only penalizes harmful volatility
- Profit Factor: Gross profit divided by gross loss
Avoiding Overfitting
Overfitting is the #1 killer of trading strategies. Here’s how to prevent it:
- Use Walk-Forward Testing: Train on older data, test on newer data
- Cross-Validation: Time-series cross-validation to verify robustness
- Parameter Stability: Check if small parameter changes drastically affect performance
- Multiple Market Conditions: Test during bull, bear, and sideways markets
Paper Trading
After successful backtesting, paper trading is the next critical step before risking real capital.
Setting Up Paper Trading
Many exchanges offer paper trading accounts:
- Binance Testnet
- FTX Paper Trading
- Bybit Testnet
Alternatively, you can create a simple paper trading simulator:
class PaperTrader:
    def __init__(self, starting_balance=10000):
        self.balance = starting_balance
        self.positions = {}
        self.trade_history = []

    def buy(self, symbol, price, amount=None, percent=100):
        if amount is None:
            amount = (self.balance * percent / 100) / price

        cost = amount * price
        if cost > self.balance:
            print("Insufficient funds")
            return False

        self.balance -= cost
        if symbol in self.positions:
            self.positions[symbol] += amount
        else:
            self.positions[symbol] = amount

        self.trade_history.append({
            'action': 'buy',
            'symbol': symbol,
            'price': price,
            'amount': amount,
            'timestamp': pd.Timestamp.now()
        })
        return True

    def sell(self, symbol, price, amount=None, percent=100):
        if symbol not in self.positions or self.positions[symbol] == 0:
            print("No position to sell")
            return False

        if amount is None:
            amount = self.positions[symbol] * percent / 100

        if amount > self.positions[symbol]:
            print("Insufficient position size")
            return False

        self.positions[symbol] -= amount
        self.balance += amount * price

        self.trade_history.append({
            'action': 'sell',
            'symbol': symbol,
            'price': price,
            'amount': amount,
            'timestamp': pd.Timestamp.now()
        })
        return True

    def get_portfolio_value(self, current_prices):
        total = self.balance
        for symbol, amount in self.positions.items():
            if symbol in current_prices:
                total += amount * current_prices[symbol]
        return total
Testing for a Full Market Cycle
Paper trade for at least one full market cycle (typically 2-3 months in crypto) to catch various market conditions.
Deploying to Live Markets
Once satisfied with paper trading results, it’s time to go live.
Exchange API Connection
import ccxt
import json
import time

# Load API keys from config file
with open('config.json', 'r') as f:
    config = json.load(f)

# Initialize exchange with API keys
exchange = ccxt.binance({
    'apiKey': config['binance']['api_key'],
    'secret': config['binance']['secret_key'],
    'enableRateLimit': True,
})

# Verify connection
print(exchange.fetch_balance())
Security Best Practices
- API Key Restrictions: Limit API permissions to trading only
- IP Whitelisting: Only allow connections from your server IP
- Secure Key Storage: Never hardcode keys in your script
- Withdrawal Protection: Disable withdrawal permissions
Deployment Options
VPS Hosting
Use a Virtual Private Server for 24/7 uptime:
- DigitalOcean
- AWS EC2
- Google Cloud
Cloud Functions
For event-driven bots:
- AWS Lambda
- Google Cloud Functions
- Azure Functions
Managed Services
For non-technical users:
- 3Commas
- Coinrule
- Cryptohopper
Monitoring and Optimization
Your bot needs regular monitoring and optimization to remain profitable.
Key Metrics to Track
- Performance vs. Benchmark: Compare against BTC or ETH
- Drawdown Monitoring: Watch for excessive drawdowns
- Win Rate: Track percentage of profitable trades
- Implementation Shortfall: Slippage between expected and actual fills
Optimization Framework
from sklearn.model_selection import GridSearchCV
from sklearn.ensemble import RandomForestClassifier

# Define parameter grid
param_grid = {
    'n_estimators': [50, 100, 200],
    'max_depth': [None, 10, 20, 30],
    'min_samples_split': [2, 5, 10],
    'min_samples_leaf': [1, 2, 4]
}

# Grid search
grid_search = GridSearchCV(
    estimator=RandomForestClassifier(random_state=42),
    param_grid=param_grid,
    cv=5,
    scoring='accuracy',
    n_jobs=-1
)

grid_search.fit(X_train, y_train)
print(f"Best parameters: {grid_search.best_params_}")
print(f"Best accuracy: {grid_search.best_score_:.4f}")

# Use best model
best_model = grid_search.best_estimator_
Advanced Techniques
Once you’ve mastered the basics, consider these advanced approaches.
Deep Learning for Time Series
Deep learning models like LSTM (Long Short-Term Memory) networks excel at time series prediction:
from tensorflow.keras.models import Sequential
from tensorflow.keras.layers import LSTM, Dense, Dropout
from sklearn.preprocessing import MinMaxScaler
import numpy as np

# Prepare data for LSTM (reshape to [samples, time steps, features])
def create_sequences(data, seq_length):
    X, y = [], []
    for i in range(len(data) - seq_length - 1):
        X.append(data[i:(i + seq_length), :])
        y.append(data[i + seq_length, 0])  # Predict close price
    return np.array(X), np.array(y)

# Scale data
scaler = MinMaxScaler()
scaled_data = scaler.fit_transform(df[['close', 'volume', 'rsi', 'macd']].values)

# Create sequences
seq_length = 60  # Use 60 time steps to predict the next
X, y = create_sequences(scaled_data, seq_length)

# Split data
train_size = int(len(X) * 0.8)
X_train, X_test = X[:train_size], X[train_size:]
y_train, y_test = y[:train_size], y[train_size:]

# Build LSTM model
model = Sequential()
model.add(LSTM(units=50, return_sequences=True, input_shape=(X_train.shape[1], X_train.shape[2])))
model.add(Dropout(0.2))
model.add(LSTM(units=50))
model.add(Dropout(0.2))
model.add(Dense(units=1))

model.compile(optimizer='adam', loss='mean_squared_error')
model.fit(X_train, y_train, epochs=25, batch_size=32, validation_split=0.1)
Reinforcement Learning
Reinforcement learning treats trading as a game environment where the agent learns to maximize returns:
Key Components:
- State: Market conditions, portfolio status
- Action: Buy, sell, hold
- Reward: Profit/loss
- Environment: Market simulator
Ensemble Methods
Combine multiple strategies for more robust performance:
- Voting Ensemble: Multiple models vote on trading decisions
- Stacked Ensemble: Use outputs from models as inputs to a meta-model
- Timeframe Ensemble: Combine signals from different timeframes
Risk Management
No trading system is complete without proper risk management.
Position Sizing
def calculate_position_size(account_balance, risk_per_trade, stop_loss_percent):
    # Risk only a fixed percentage of account per trade
    max_risk_amount = account_balance * risk_per_trade
    position_size = max_risk_amount / stop_loss_percent
    return position_size
Stop Loss Implementation
def implement_stop_loss(exchange, symbol, position, stop_price):
    try:
        order = exchange.create_stop_loss_order(
            symbol=symbol,
            type='stop',
            side='sell',
            amount=position,
            price=stop_price
        )
        return order
    except Exception as e:
        print(f"Error setting stop loss: {e}")
        return None
Key Risk Parameters
- Risk Per Trade: 1-2% of account maximum
- Correlation Risk: Avoid highly correlated assets
- Market Exposure: Limit total capital at risk
- Drawdown Limits: Pause trading after X% drawdown
FAQ
How much capital do I need to start trading with a bot?
Answer: While you can technically start with any amount, I recommend at least $1,000-$5,000 for serious trading. This provides enough capital to:
- Cover exchange trading fees
- Allow for proper position sizing
- Minimize the impact of small price movements
Smaller accounts often struggle with minimum order sizes and fee impacts.
How long does it take to build a profitable AI trading bot?
Answer: Building a consistently profitable bot typically takes 3-6 months of development, testing, and refinement. The process involves:
- Initial strategy development (1-2 weeks)
- Backtesting and optimization (2-4 weeks)
- Paper trading (1-2 months)
- Live trading with adjustments (2-3 months)
Expect several iterations before achieving consistent profitability.
What programming skills do I need?
Answer: For a custom AI trading bot, you’ll need:
- Intermediate Python skills
- Basic understanding of data science libraries (pandas, scikit-learn)
- Knowledge of API interactions
- Basic machine learning concepts
Alternatively, platforms like 3Commas or Trality offer no-code or low-code options for beginners.
What are the most common mistakes beginners make?
Answer: The top mistakes I see new bot developers make:
- Overfitting strategies to historical data
- Insufficient backtesting across market conditions
- Ignoring trading fees in calculations
- Poor risk management
- Constantly changing strategies without proper testing
Can AI trading bots work in bear markets?
Answer: Yes, AI trading bots can be profitable in bear markets through:
- Short-selling when exchanges allow it
- Trading market volatility rather than direction
- Implementing mean-reversion strategies
- Focusing on range-bound trading
- Utilizing futures or options markets
The key is designing strategies that don’t rely solely on upward price movement.
Conclusion
Building an AI trading bot is a journey that combines technical skills, market knowledge, and disciplined execution. Start simple, focus on risk management, and gradually increase complexity as you gain experience.
Remember that no trading system is perfect, and continuous learning is essential. Markets evolve, and your strategies must evolve with them. The most successful traders I know are those who adapt their systems based on market conditions while maintaining strict risk management.
By following this guide, you’ve taken the first steps toward algorithmic trading. Now it’s time to build, test, and refine your own unique trading strategy.
Good luck and happy trading!
Author

Vanna Berkey is a young, ambitious woman who has a passion for blockchain technology and cryptography. She has been working in the cryptocurrency industry since she was 18 years old, and is an expert in blockchain algorithms. Vanna is determined to use her knowledge and skills to make a positive impact on the world.